1-Wire is a communication bus, wich uses only 1 wire^W 2 or 3 wires for communications between slaves and a master. One of the most common 1wire module is a temperature sensor, the DS18b20. This is already calibrated, directly on the production line, and like all 1wire chips it contains a unique identifier.
The DS18B20 has an operating temperature range of -55°C to +125°C. And the sensor is accurate to +/-0.5°C over the range of -10°C to +85°C. And it’s cheap, you can find it for less than 1€. You can even found a waterproof version of this sensor.
As it uses only 2 or 3 wires, it’s easy to add this kind of sensor in a house or an appartment, you only need a pair of twisted wires, like the one we found in ethernet or telephony cables.
On the home automation box, you need an hardware interface to communicate with the sensor, and a program to talk with this interace. Calaos and more specifically calaos-os integrate such sofware : owfs
For the hardwre interface, you have 3 choices. If your home automation box, is a Raspberrypi or an electornic card with GPIOs, you may use the w1 linux kernel driver. It emulates a 1wire master with a single gpio. The only thing you have to do is to connect 1-wire sensors to the Rpi GPIO like here :
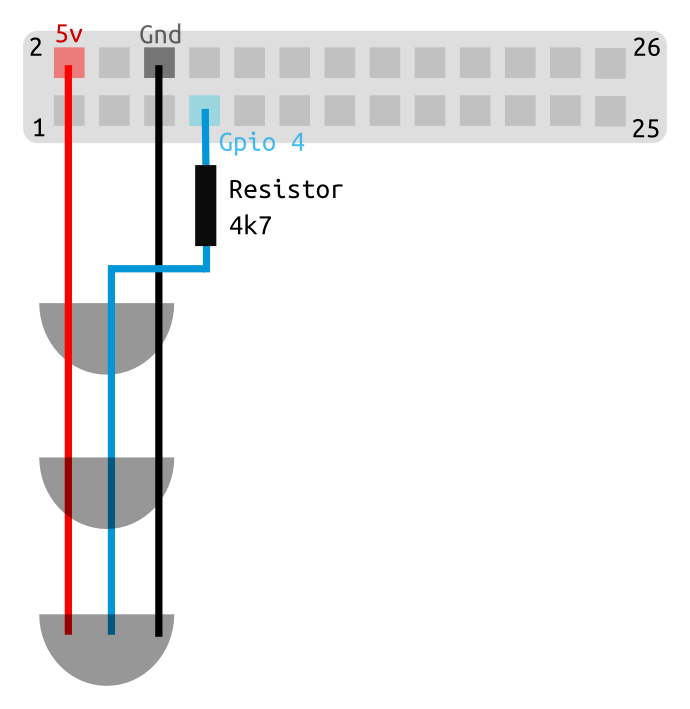
As you can see, 1wire is a bus so we can chain temperature sensors.
Now on the sofware side, once you have calaos-os installed on your Raspberrypi, you need to load the w1 module. It’s responsible to handle the communication with the sensors.
modprobe w1-gpio
modprobe w1_therm
I guess you want this changes to be persistent over reboot of the rpi, so to do that create a new file named w1.conf in the /etc/modules-load.d/ directory. And add those two lines :
w1-gpio
w1_therm
Now we have to configure Calaos to add the 1wire temperature sensor.
On your computer, launch calaos_installer. Auto detect calaos server by clicking on the Auto Detect button. The IP of calaos_server should appear in the list. So you can connect to calaos_server and download your configuration.
Now add the 1wire temperature sensor, click Add Item -> 1wire -> temperature sensor

Name is the name that the sensor will take in all Calaos User Interfaces.
Sensor ID, is the 1wire ID. It’s unique for each sensor, and can be read on the sensor itself, it’s something like 28.A691B4040000. (It’s really small on the sensor, but i swear it’s written)
Finally the OWFS argument, is the argument taht will be passed to owfs to initialize itself. For w1 kernel driver, it’s –w1
Save the config, upload it again on you home automation box. And the new temperature should be displayed on Calaos Home, Calaos Mobile or Calaos Web.
If you don’t have, or don’t want to use GPIOs, and solder the sensors by yourself, you can choose an easier solution, and connect an USB module : the DS9490R module and connect 1wire sensors with RJ11 cable. On Calaos side, it’s exactly the same configuration. The only point is to change the OWFS argument, and use the “-u” argument instead of “–w1”.

There is also an other solution, with an ethernet device on which you can connect your sensor, and then the communication between your Home Automation box and the module goes through ethernet. This solution should also work on Calaos (well somebody said it worked), and you might change the OWFS arguments and add the ip and port of the Enet server like this : “–enet=192.168.2.43 -p 4304”
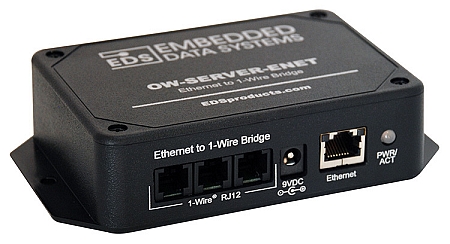
I can confirm the 1wire in calaos works with the OW-SERVER-ENET as described
Can’t seem to get it to work. I get the serial from /sys/bus/w1/devices/ where i have two sensors named: 28-000004c03e79 and 28-000004bf624e. I’ve tried both of them with calaos installer with these parameters:
ow_id: 28-000004c03e79 (Tried with a “.” instead of “-” , no luck)
ow_args: -w1 (Tried “w1”, “-w1”, “w1_slave”, “-w1_slave”, no luck) 😛
type: OWTemp
I know the sensor is working.
root@raspberrypi:/# cat /sys/bus/w1/devices/28-000004bf624e/w1_slave
8c 01 4b 46 7f ff 04 10 2e : crc=2e YES
8c 01 4b 46 7f ff 04 10 2e t=24750
Sugestions?
Here an extract of my conf :
ow_args="--w1" ow_id="28.A691B4040000"I don’t know why, but W1 and OWFS don’t display ID with the same endianness.
In your case it should be :
28.793EC0040000Ok it works for me this way but the tuto should be corrected: OWFS arguments to use is “–w1” instead of “-w1”.
ATTENTION! The Rpi wire diagram is wrong. The power pin of the 1-wire device can be connected to 5V or 3.3V but the GPIO are 3.3V so the pull-up resitor must be connected to the 3.3V and not to the 5V pin, or you can kill your Rpi.
For Calaos v3 see also https://calaos.fr/forum/showthread.php?tid=682&pid=6407#pid6407